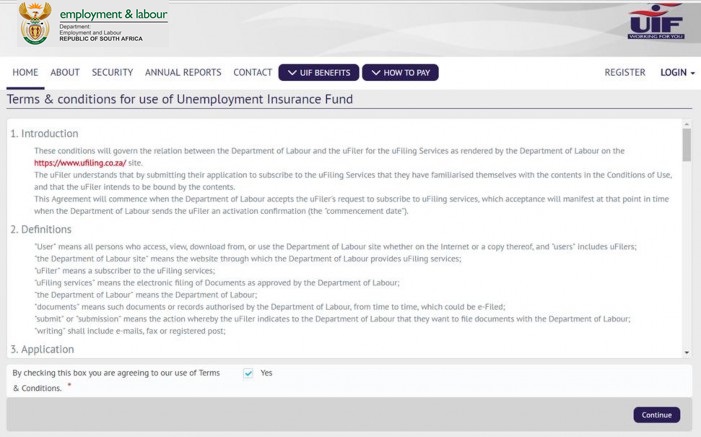
Click on REGISTER in the top right-hand corner to review the terms and conditions for use of the Unemployment Insurance Fund portal. You need to accept the terms and conditions and then click on Continue to proceed.
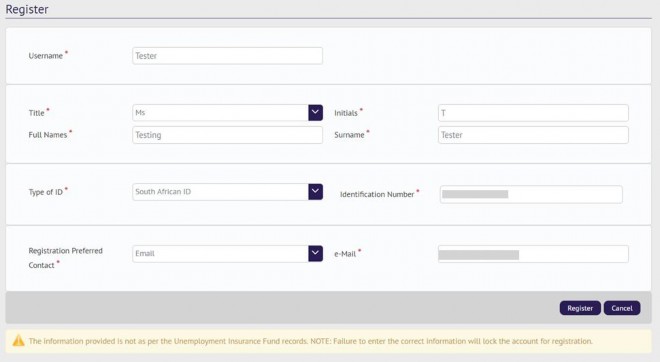
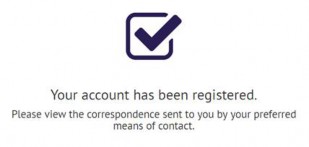
Complete all the required information and click on Register. This will send the captured data to the UIF for verification.
When you receive the activation message via your preferred method of contact, click on the link provided to activate your account.
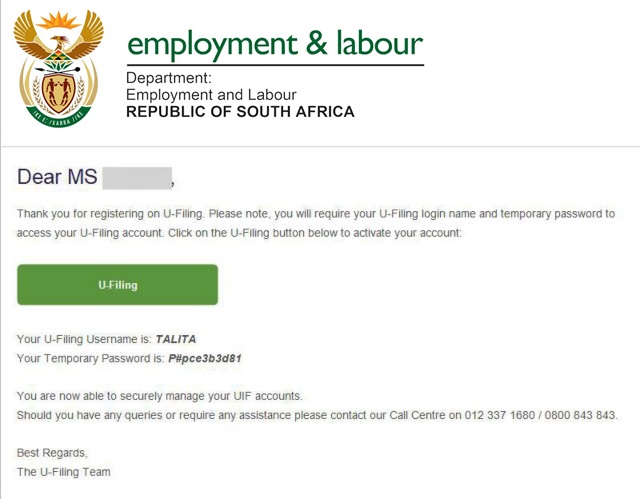
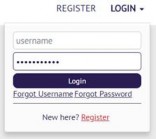
Use the username and temporary password provided in the email or SMS to log in to your new uFiling account.
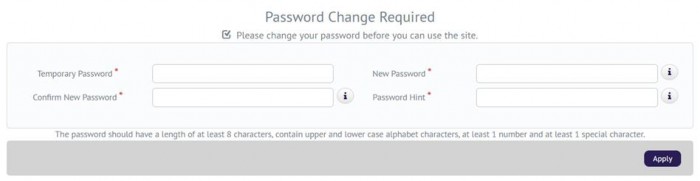
After your first login, the system will prompt you to change your password.
For security reasons, you will then have to complete a vetting process by confirming demographic information about yourself, which will be compared to the data available to the Department of Labour.
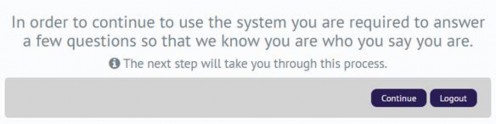
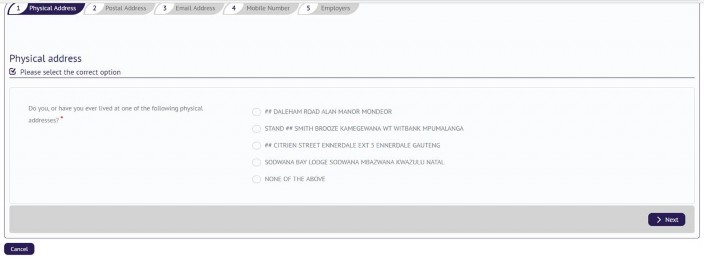
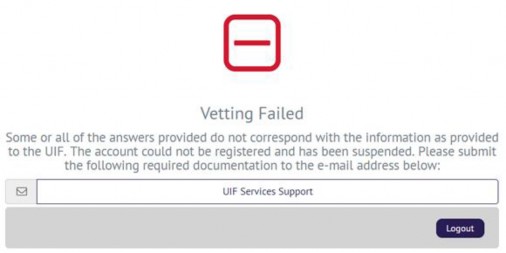
If any of the questions are answered incorrectly, a message will appear to indicate that you failed the vetting process. Please contact uFiling Support through the UIF Services Support.
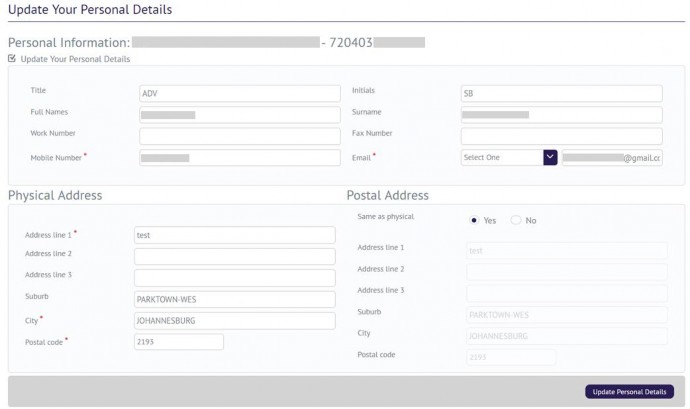
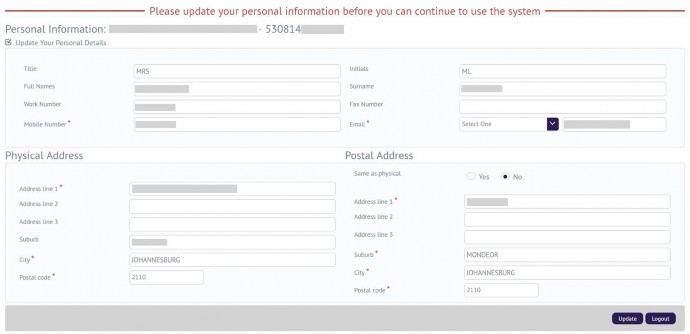
Once you successfully completed vetting, you will be directed to a page where you can update your personal details before you can proceed to the uFiling website.
Individuals can apply online for the following UIF benefits on the uFiling website:
Click on Benefit Application and Payments on the left, and then click on Apply for Benefits.
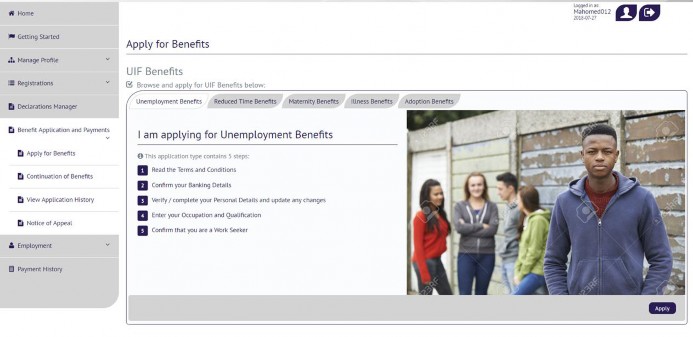
Select which type of Benefit you want to apply for, and click on Apply in the bottom right corner.
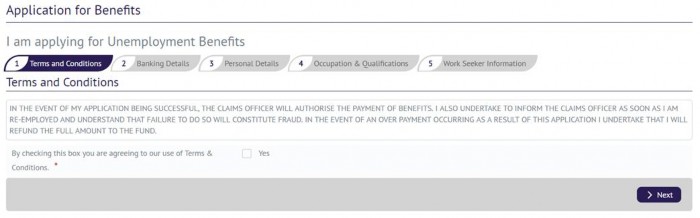
You must accept the terms and conditions to proceed: check the tick box and click on Next.
Verify your bank details and click on Next to continue or click on Banking Details Incorrect? . Bank details may only be captured once on the uFiling system, to update new bank details, download the UI2.8 Form from the Department of Labour website (www.labour.gov.za ). One portion of the UI2.8 Form must be completed by your bank and the other portion by you. Email the completed UI2.8 Form and your contact details to VOsupport@labour.gov.za

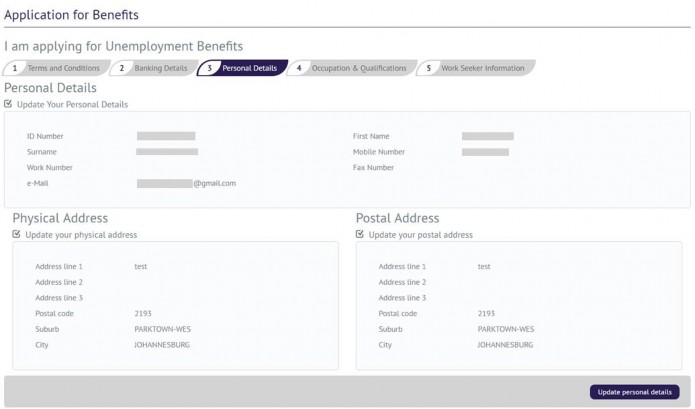
Update your personal details such as contact details and address. Thereafter click on Update Personal Details.
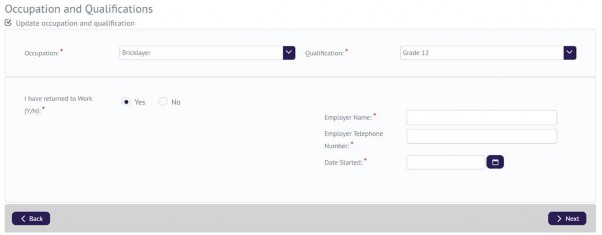
Complete the information related to your occupation and qualifications, and click on Next.
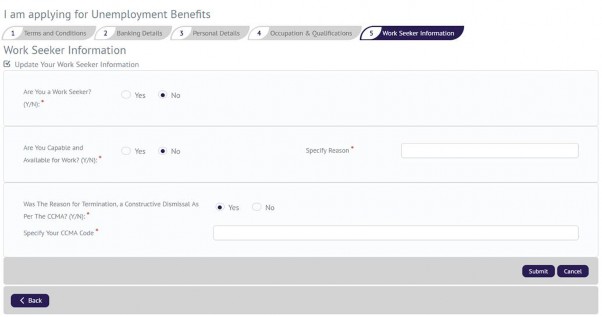
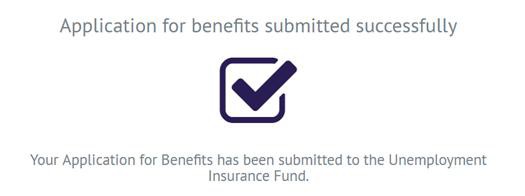
Update your work seeker information and click on Submit when you are done to send your application to the UIF. You will receive a confirmation message if your application was successfully submitted.
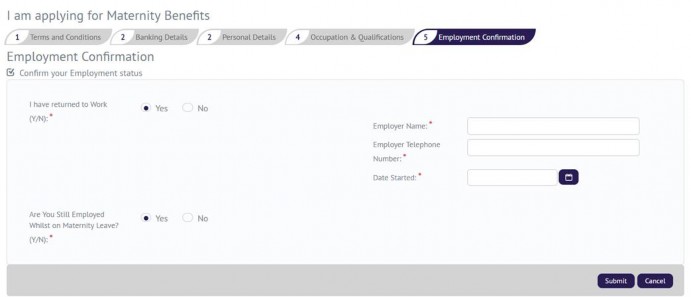
The processes to apply for other Benefit types are the same:
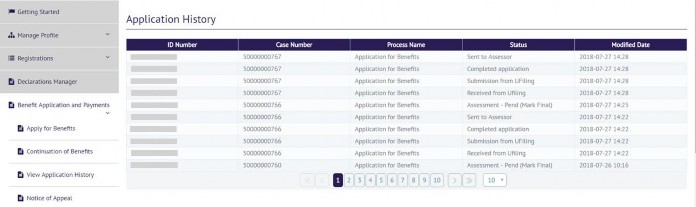
A full record of your application history is available on the uFiling website, click on Benefit Application and Payments on the left-hand side, and select View Application History.
You can lodge a notice of appeal if your application for benefits was declined. Click on Benefit Application and Payments on the left-hand side and select Notice of Appeal and click on Next.
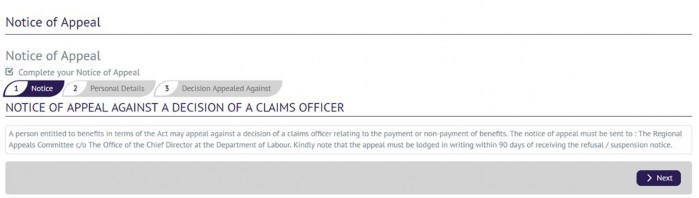
Verify or update Personal details if needed.
Complete required information related to the declined application.
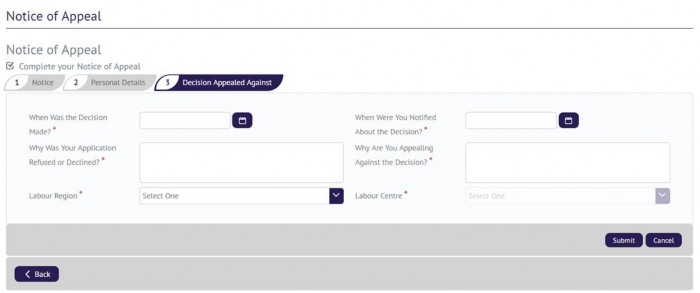
Click on Submit to lodge your Notice of Appeal.
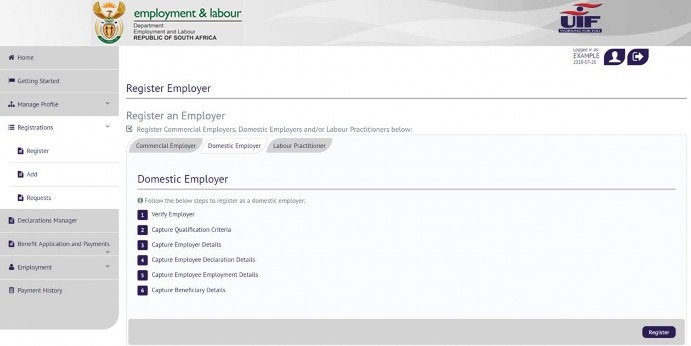
Users can register new Employers with the UIF on the new uFiling website or add existing UIF reference numbers or employers to your uFiling profile to submit and pay declarations. You can register as a domestic employer, a commercial employer or a labour practitioner with the UIF.
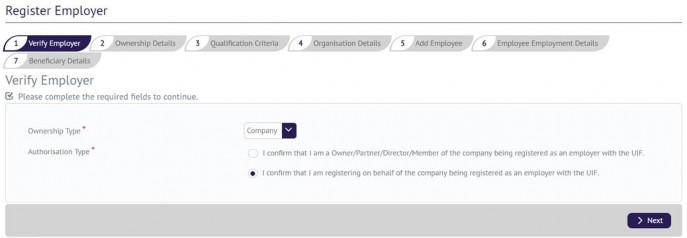
Select which type of Employer you want to register and uFiling will display the steps to follow to complete registration. In this example we selected a Domestic employer. Click on Register at the bottom on the right once you have made your selection.
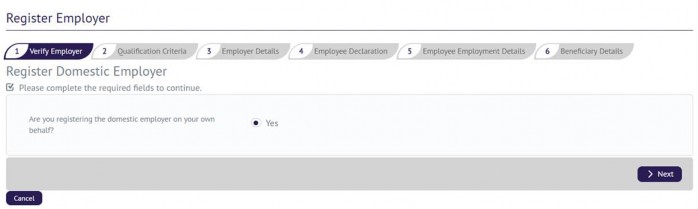
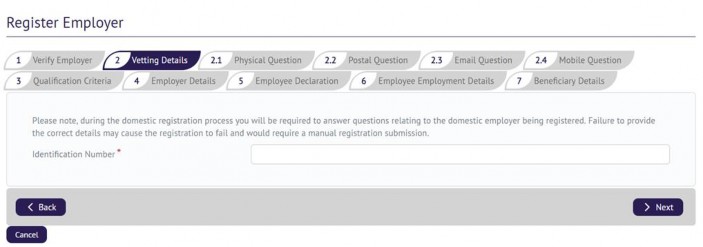
Verify the domestic employer details that you wish to register. If you are not completing the registration for yourself, you need to be a registered Labour Practitioner. You will also be asked to complete a vetting process, verifying historical contact details below to complete the registration as Domestic Employer on behalf of another individual.
The information you may need to verify includes:
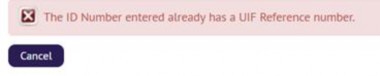
You can only register as a Domestic employer once with your ID number.
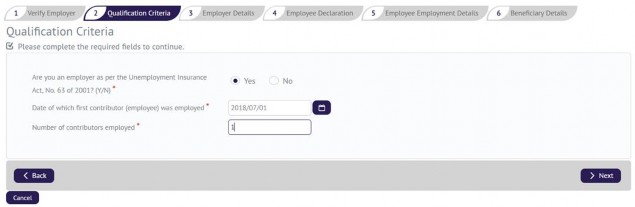
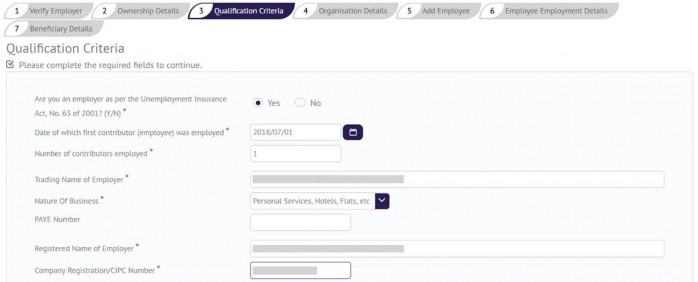
Qualification Criteria: confirm employer status by selecting the Yes radio button and complete the required information, then click Next to continue.
Complete personal and contact details for the new Employer.

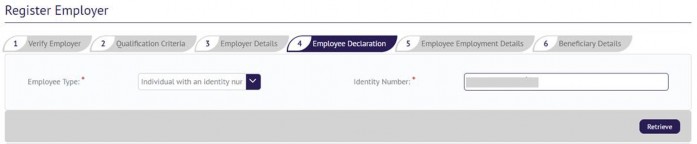
Add at least one employee as part of the registration process, starting with their identity number and then click on Retrieve. This will send a request for the information available for that ID number at the UIF and populate this on the next screen.
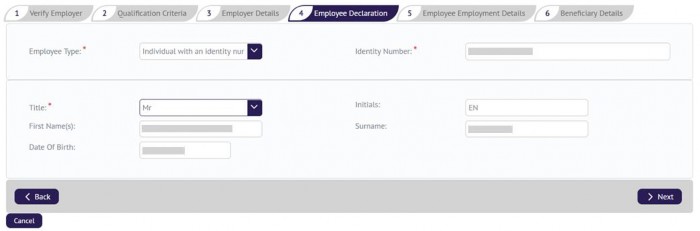
Capture the employee's details and click on Next.
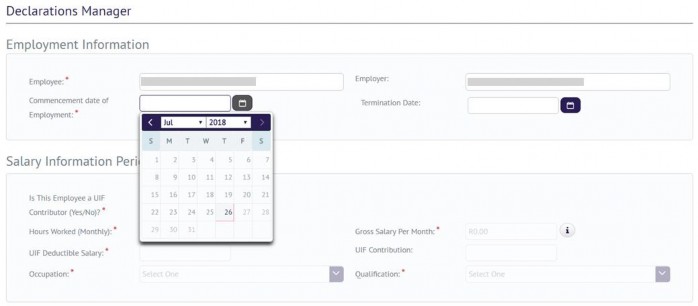
Complete all required fields related to the individual's employment, including demographic details and salary information. Click on Up or on Next to continue to the last step.

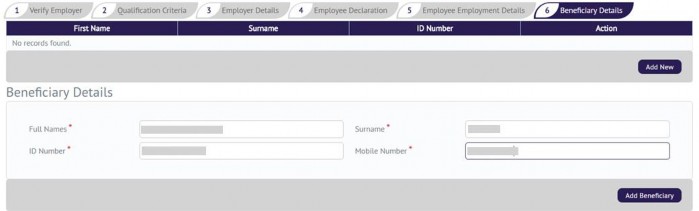
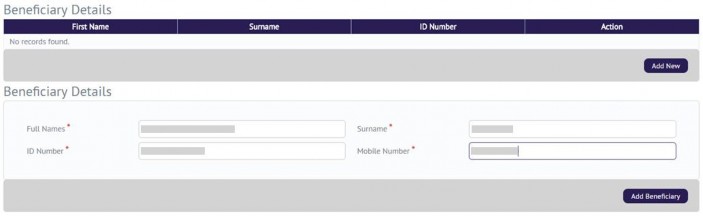
Add details of at least one beneficiary for your employee and click on Add Beneficiary. Repeat this step to load more than one beneficiary, and then click on Submit to finalise the new Domestic Employer registration.

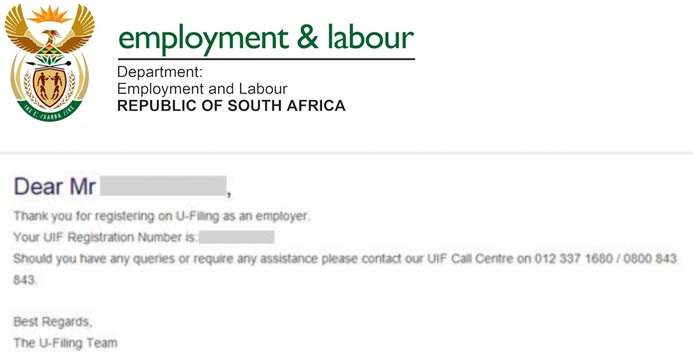
You will receive an email from the Department of Labour with the UI number for the new employer once the registration application was processed successfully.
Repeat this process for all new domestic employer registrations.
To register a new Commercial Employer, select this option on the Registrations page and click on Register to continue.
Select an Authorization Type from the options listed for the ownership type you picked. Click Next to continue.
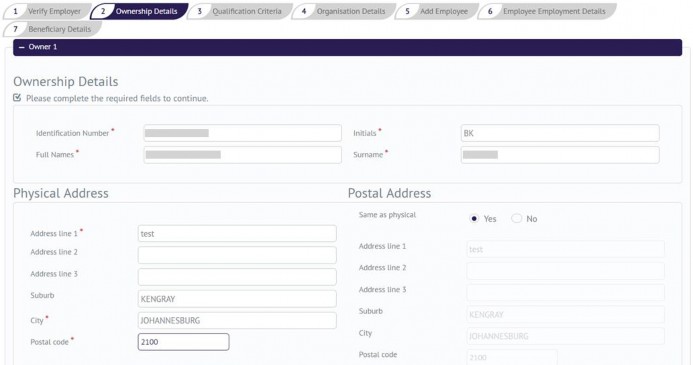
Complete Ownership details and verify or complete address fields, then click Next to continue.
Qualification Criteria: Complete the required information and click on Next to continue.
Follow Steps 4-9 to complete the rest of the registration process for a new Commercial Employer.
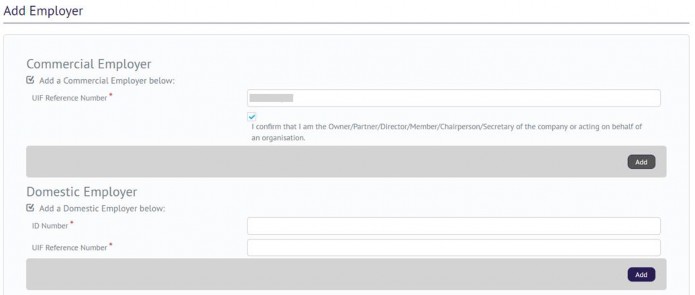
Select Registrations on the right-hand menu pane and click on Add.
Select Commercial Employer if applicable, and complete the UIF reference number for the employer before clicking on the Add button;
Or
Select Domestic Employer; complete the employer's ID number and UIF reference before clicking on the Add button.
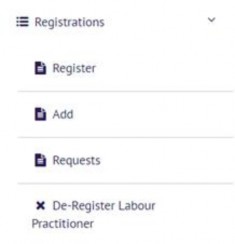
A system generated email will be sent to the Owner/ Director/ Member of the organisation for approval. To track progress, click on Registrations on the right and select Requests, this will display a list of all requests. The status next to a request will reflect as Pending until approved, when the status will update to Accepted.


Through uFiling, Employers (Commercial and Domestic), Agents or Tax Practitioners can easily declare and pay UIF contributions online, view all previous declarations and contributions made, and receive notifications about future declarations.
Simply capture or update employer and employee details when needed, including salary and employment details, uFiling will automatically prepare and populate your monthly declarations for review before you submit.
Please note: All information populated on the UI declarations are retrieved from the information you captured for employer and/or employee(s). Declarations can't be modified or edited, you need to update or correct employer or employee details which will update the declaration in turn.
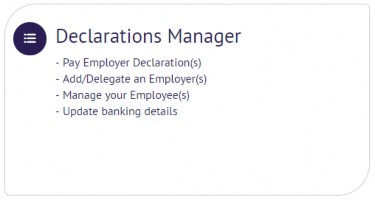
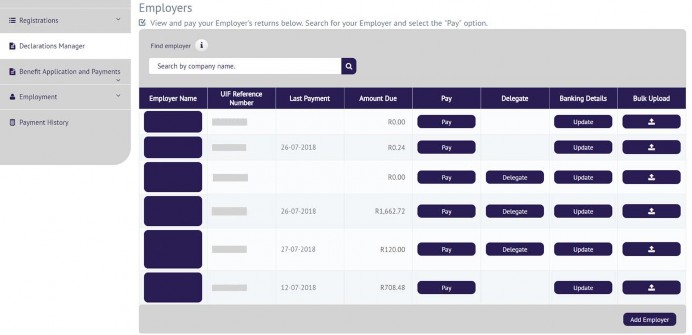
Click on Declarations Manager on the right, this will display a list of the Employers linked to your uFiling profile.

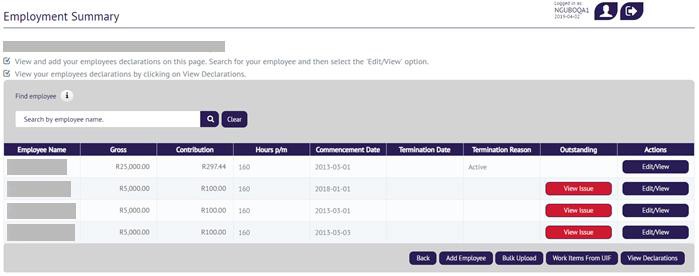
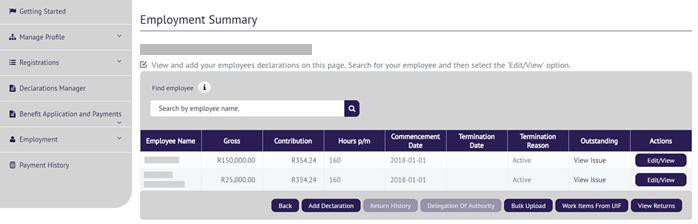
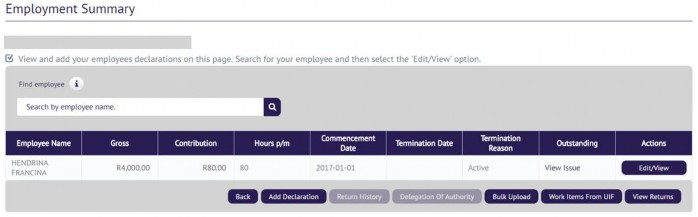
To view or retrieve active employees for an existing employer, click on the name of that employer on the left. This will display the Employment Summary for that employer, including an employee list and declaration summary.

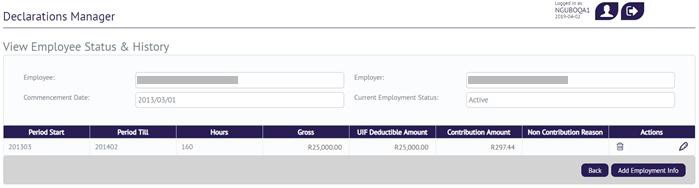
To manage or update employee information, scroll through the employee list or use the search function to find the relevant employee record. Click on the Edit/View button on the right to view the employment status and history for that individual.
To capture new employees, click on Add Employee below the employee list on the Employment Summary page and follow the remaining steps detailed in the next section.

Existing users may need to complete a few additional steps to retrieve historical declaration data before processing current declarations on the new uFiling website. Click on Declarations Manager on the left and click on the relevant Employer to open the Employment Summary. Click on View Declarations below the table on the right.
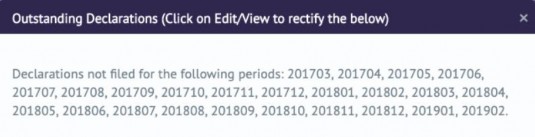
Tip: Click on View Issue for a summary of possible issues with declarations. Click on View/Edit to rectify the relevant declaration(s)

Click on Calculate Declarations to view a grid displaying a five year history of prior declarations.
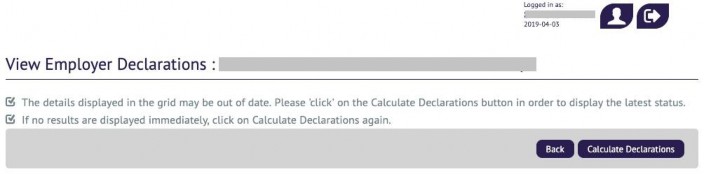
If no results are displayed immediately, click on Calculate Declarations again.
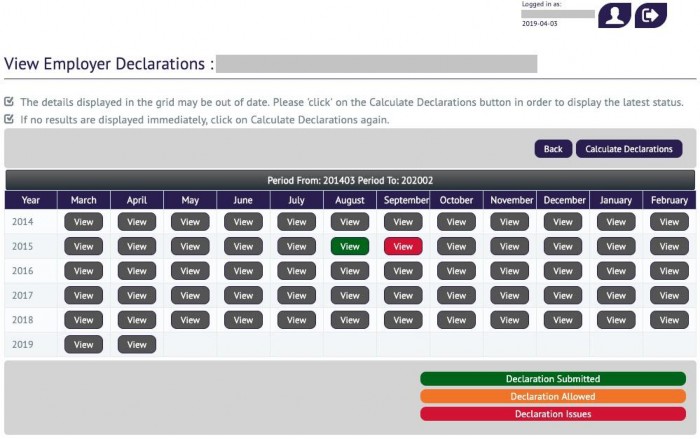
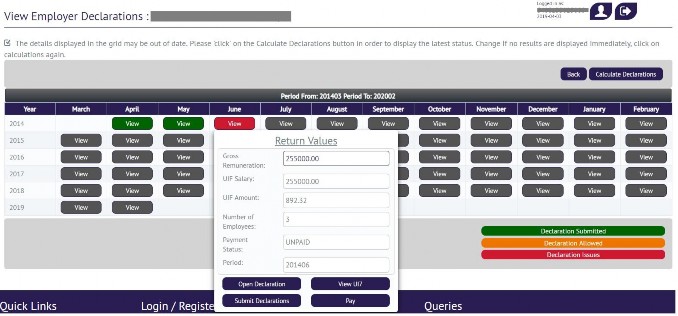
On the Employer Declaration screen, select the month displayed in red on the grid (click on View), and click on Open Declaration
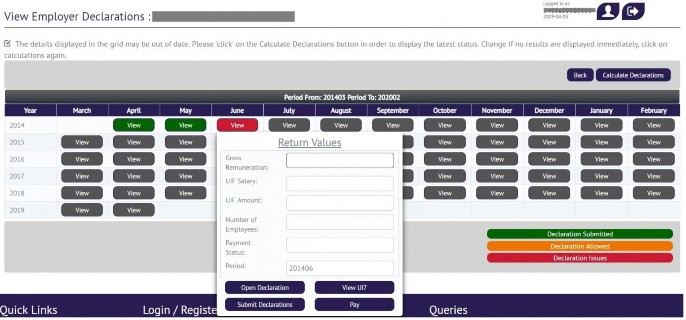
Repeat Steps 5 and 6 and select the same period as before, the Declaration values should now be populated for the user to review.
Click on Declarations Manager on the right, this will display a list of the Employers linked to your uFiling profile.
To view details for a specific employer, click on the name of that employer on the left. This will display the employee and declaration summary. On new Domestic Employer profiles, it may be necessary to add one employee before you can view, submit, pay or amend a declaration.


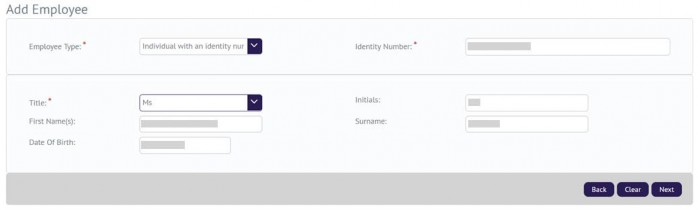
Add full names and ID number for an employee and click on Next.
Capture employment and salary information and click on Next.
You must add at least one beneficiary for each employee. Click on Add New to capture more.
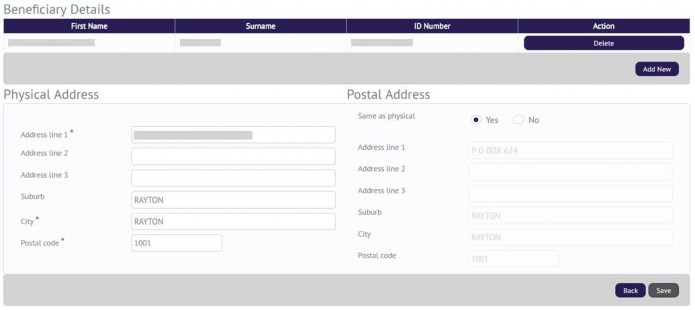
Capture or update demographics, including physical and postal addresses for the employee and click on Save to add the employee details for the employer.
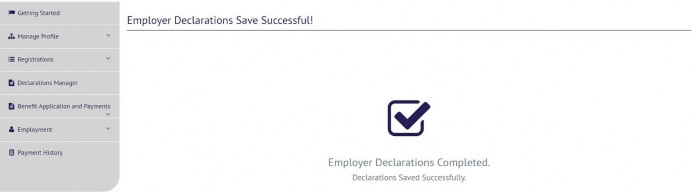
A confirmation message will display when the employee record and declaration is saved.
From the Declarations Manager and by selecting an employer, you can:
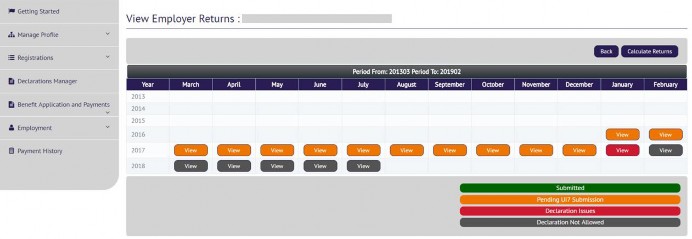
View Returns - click on Calculate Returns to display a history of declarations for 5 years, with a status reflected for each period.
If you click on View for any period, it will open a summary of the declaration for that period and list options to allow you to open, view or submit the declaration.
Once all employees and related employment and salary information is added, you are ready to submit. Click on Submit to send a declaration to the UIF. A confirmation message will display after successful submission, and the status on your declaration dashboard will update to Submitted.


Click on Pay next to an employer and declaration to view a list of outstanding payments

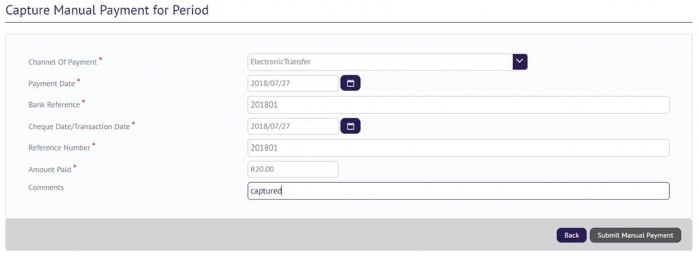
In this example, Manual Payment for Period was selected. Capture all details of the external payment and then click on Submit Manual Payment.
Click on Pay next to an employer and declaration to view a list of outstanding payments
Click on Pay next to an employer and declaration to view a list of outstanding payments
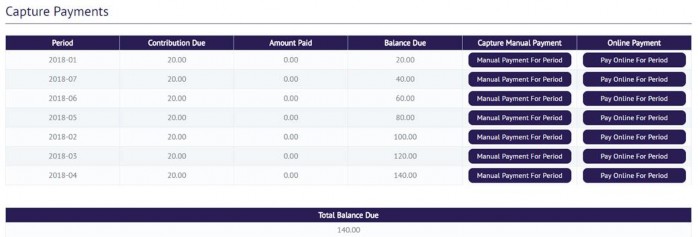
In this example, Pay Online For Period was selected. Select a bank account from the drop-down list and click on Continue.
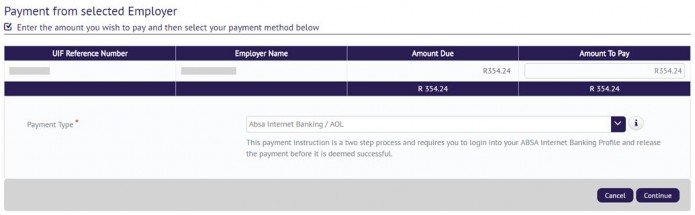
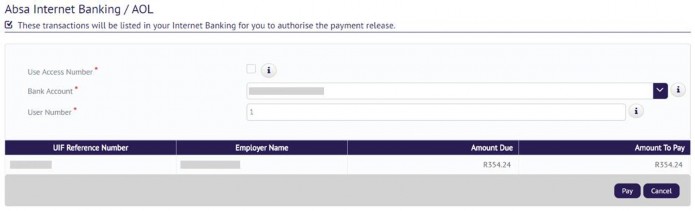
Double check the details displayed of the payment you're about to create and click on Pay. Remember to log on to your banking application to approve the payment within the allowed time limit.
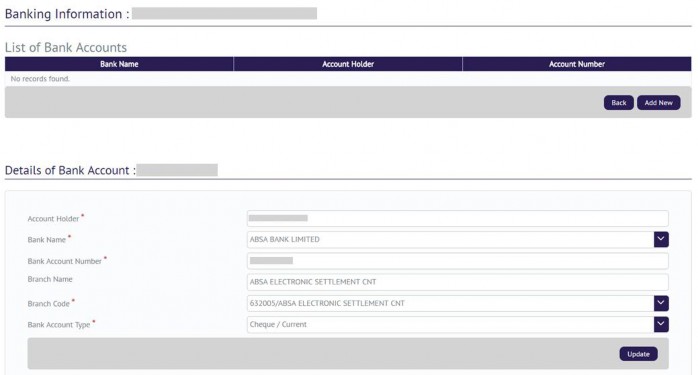
If no banking details are listed, or if a new account must be added you will need to capture this before you can finalise online payments. Click on Add New on the List of Bank Accounts and capture the details of the employer's (new) bank account. Click on Update to save the captured information.
When needed, responsibility for an employer declaration(s) can be delegated to a third party.
Complete all the required fields, and remember to assign permissions for this delegate:
Click on Send Invitation
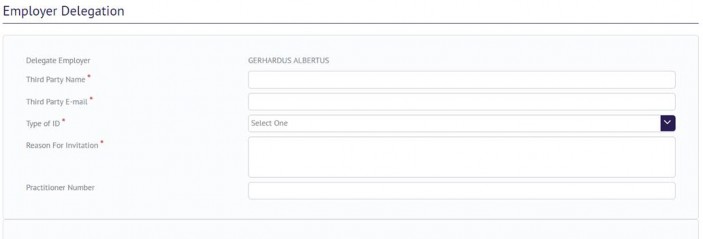

A system generated message will be sent to the delegate with an option to accept or decline the invitation.
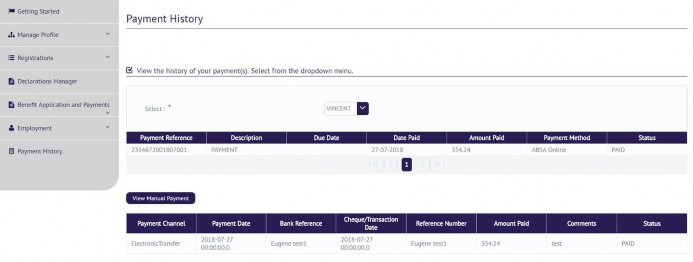
The details of all electronic and manual payments are reflected on the Payment History Page. The status listed next to each payment will update to PAID once the transaction is cleared.
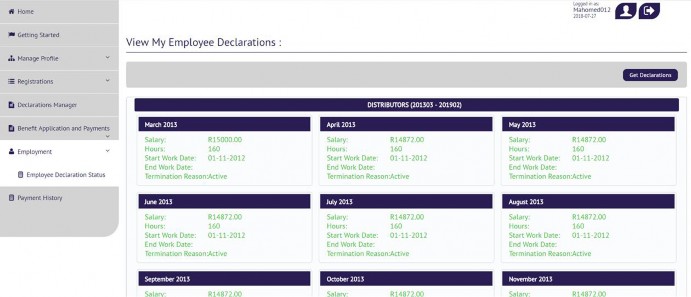
Select Employment on the left and click on Employee Declaration Status to view detail of all your historical contributions.
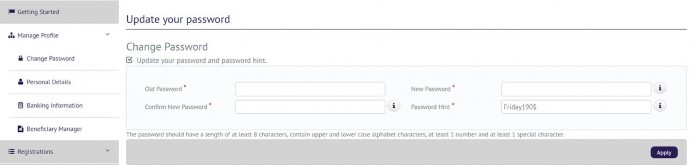
Click on Manage Profile and then on Change Password to update your uFiling password when needed. Complete all the mandatory fields and click on Apply.
Your own banking information may only be captured once. If you need to change or add another bank account, refer to Chapter 2, Step 4. Bank details may only be captured once on the uFiling system.
To update new bank details, download the UI2.8 Form from the Department of Labour website (www.labour.gov.za).
One portion of the UI2.8 Form must be completed by your bank and the other portion by you. Email the completed UI2.8 Form and your contact details to VOsupport@labour.gov.za

More Beneficiaries (up to a maximum of 4) can be added by clicking on the Add New button and completing the name and ID number in the required fields and then clicking on Add beneficiary.
Click on Personal Details to update contact and demographic information on your profile, including physical and postal addresses.